Air Fryer Chicken Tenderloins: Juicy, Crispy, & Easy Recipes

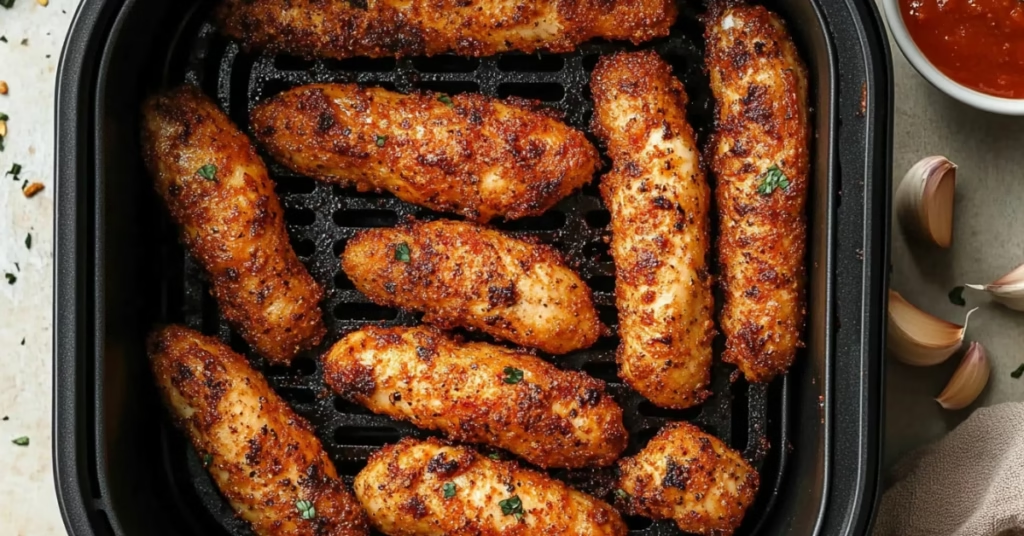
Seasoned air fryer chicken tenderloins served with a red dipping sauce, a perfect blend of crispy and juicy textures.

Chicken tenderloins are among the most versatile and easy-to-prepare cuts of chicken. With an air fryer, you can turn this tender, juicy meat into a crispy, flavorful dish without the need for excessive oil. This guide covers everything from basic preparation to advanced tips and variations, ensuring your tenderloins are always a hit.

What Are Chicken Tenderloins?

Chicken tenderloins are thin strips of meat located under the chicken breast. These pieces are prized for their tenderness, making them perfect for quick meals. Their mild flavor means they absorb marinades and seasonings well, offering endless possibilities for delicious recipes.

Nutritional Profile

  • High in protein: Approximately 20g per 3-ounce serving.
  • Low in fat: Only about 2g of fat per serving.
  • Rich in essential nutrients like niacin and vitamin B6.

Chicken tenderloins are a great choice for those following a high-protein, low-fat diet.

Why Use an Air Fryer for Chicken Tenderloins?

An air fryer is a modern kitchen appliance that circulates hot air to mimic the results of deep frying without the oil. For chicken tenderloins, the air fryer ensures:

  • A crispy exterior while keeping the interior juicy.
  • Faster cooking times compared to baking or pan-frying.
  • Minimal use of oil, making it a healthier option.

To learn more about maximizing your air fryer, check out this comprehensive guide to air frying.

Step-by-Step Recipe for Air Fryer Chicken Tenderloins

This recipe is simple and perfect for beginners. It yields tender, crispy chicken that pairs well with various sides.

Ingredients

Air Fryer Chicken Tenderloins

Recipe by Air Fryer repastsCourse: Main CourseCuisine: AmericanDifficulty: Easy
Servings

4

servings
Prep time

30

minutes
Cooking time

40

minutes
Calories

300

kcal
Total time

1

hour 

10

minutes

Ingredients

  • 1 pound chicken tenderloins

  • 1 tablespoon olive oil

  • 1 teaspoon salt

  • 0.5 teaspoon black pepper

  • 1 teaspoon garlic powder

  • 1 teaspoon smoked paprika

  • 0.5 teaspoon onion powder

Directions

  • Preheat the air fryer to 400 degrees Fahrenheit. This ensures an even cooking temperature throughout the process.
  • In a mixing bowl, combine the chicken tenderloins with olive oil, salt, black pepper, garlic powder, smoked paprika, and onion powder.
  • Place the seasoned tenderloins in the air fryer basket, making sure not to overcrowd them to allow for even cooking.
  • Cook the chicken tenderloins for 10-12 minutes, flipping them halfway through the cooking process for even browning.
  • Check that the internal temperature reaches 165 degrees Fahrenheit to ensure the chicken is safely cooked.
  • Once cooked, remove the chicken tenderloins from the air fryer and let them rest for 2 minutes before serving.
  • 1 lb chicken tenderloins
  • 1 tbsp olive oil or cooking spray
  • 1 tsp garlic powder
  • 1 tsp smoked paprika
  • ½ tsp salt
  • ½ tsp black pepper
  • Optional: ½ cup breadcrumbs for a crispy coating

Instructions

1. Preheat the Air Fryer

  • Set the air fryer to 375°F (190°C). Preheating ensures even cooking.

2. Prepare the Chicken

  • Pat the chicken tenderloins dry with a paper towel. This helps the seasonings adhere better.
  • In a large bowl, mix olive oil with garlic powder, smoked paprika, salt, and pepper. Add the chicken and toss to coat evenly.
  • For breaded tenderloins, dip the chicken in breadcrumbs after seasoning.

3. Cook the Tenderloins

  • Place the tenderloins in the air fryer basket in a single layer. Avoid overcrowding; cook in batches if necessary.
  • Air fry for 8-10 minutes, flipping halfway through. The internal temperature should reach 165°F (74°C).

4. Serve and Enjoy

  • Let the chicken rest for 2-3 minutes before serving. This ensures the juices are redistributed, keeping the meat tender.

Creative Variations

1. Breaded Tenderloins

For a classic crispy chicken experience:

  • Use panko breadcrumbs mixed with Parmesan cheese and Italian seasoning for extra flavor.
  • Spray the coated tenderloins with cooking spray before air frying to enhance crispiness.

2. Saucy Tenderloins

Toss your cooked chicken in your favorite sauces:

  • Honey Garlic: Mix honey, soy sauce, and minced garlic for a sweet and savory glaze.
  • Buffalo: Combine melted butter with hot sauce for a tangy kick.

3. Gluten-Free Options

  • Use almond flour or crushed rice crackers as a substitute for breadcrumbs.
  • Season with smoked paprika and chili powder for a bold flavor profile.

Advanced Tips for Perfect Air Fryer Chicken Tenderloins

1. Use a Meat Thermometer

Always check that the internal temperature reaches 165°F to ensure safety and juiciness.

2. Marinade for Flavor

Marinating your tenderloins for 30 minutes to 2 hours can elevate their taste. Try a simple mix of olive oil, lemon juice, and garlic.

3. Avoid Overcrowding

Air circulation is key in an air fryer. Overcrowding the basket leads to uneven cooking and less crispiness.

Side Dishes That Complement Chicken Tenderloins

1. Vegetables

  • Air-Fried Asparagus: A quick and nutritious option, seasoned with garlic and Parmesan. Learn more about this pairing in air fryer asparagus recipes.
  • Roasted Brussels Sprouts: Toss with olive oil, salt, and pepper for a crispy, caramelized finish.

2. Potatoes

3. Grains

  • Quinoa: Add a light drizzle of olive oil and a squeeze of lemon for a fresh, vibrant pairing.
  • Wild Rice: Its nutty flavor complements the tender chicken.

FAQs About Air Fryer Chicken Tenderloins

1. Can I Cook Frozen Tenderloins in the Air Fryer?

Yes! Add 2-3 minutes to the cooking time and ensure the chicken reaches an internal temperature of 165°F.

2. How Can I Make Them Crispier?

  • Pat the chicken dry before seasoning.
  • Use a light coat of oil spray on the tenderloins before cooking.

3. Can I Use Marinades?

Absolutely! Marinades enhance the flavor but pat the chicken dry before air frying to avoid sogginess.

Health Benefits of Air Fryer Chicken Tenderloins

Air frying is a game-changer for health-conscious cooks:

  • Lower in Fat: Requires only a small amount of oil compared to traditional frying.
  • Calorie-Friendly: A typical serving contains around 150-200 calories, depending on preparation.
  • Nutrient Retention: The quick cooking process helps retain more nutrients.

Storage and Reheating Tips

  • Storage: Place leftover tenderloins in an airtight container and refrigerate for up to 3 days.
  • Reheating: Reheat in the air fryer at 350°F (175°C) for 3-4 minutes to restore crispiness.

Conclusion

Cooking chicken tenderloins in an air fryer is a fast, healthy, and delicious way to enjoy this versatile cut of meat. Whether you prefer them breaded, saucy, or simply seasoned, the air fryer ensures perfect results every time. Pair them with creative sides like air-fried asparagus or crispy potato wedges for a complete meal.

For more inspiration, try experimenting with other air fryer recipes like crispy okra or air fryer grilled cheese.

Happy cooking, and enjoy your delicious air fryer chicken tenderloins!

Got a Minute? Leave Us a Review!

5.0
5.0 out of 5 stars (based on 1 review)
Excellent100%
Very good0%
Average0%
Poor0%
Terrible0%

Others Reviews

Yemmy Recipe

December 26, 2024

it’s A Good Recipe To Make Special on Dinner,

Please Can You Make *air fryer frozen french fries*

And Super Thanks From Adrian
Adrian


Did You Like Our Recipe ? Share it With Your Friends And Enjoy With them

How To Make Air Fryer Brats: Easy and Quick

Air fryer brats served with grilled bell peppers, parsley, and pretzel buns.

Introduction: Why Air Fry Brats?

Bratwurst, fondly known as brats, are a beloved culinary delight cherished for their savory flavors and hearty textures. Traditionally grilled or boiled, these sausages have found a new champion in the modern kitchen appliance—the air fryer. This cooking method combines speed, efficiency, and crisp perfection to create a mouthwatering dish with minimal effort.

Switching to an air fryer has numerous advantages. Not only does it save time, but it also allows you to experiment with other exciting dishes. For example, pairing brats with crispy air fryer okra or creating a side of perfectly seasoned potato wedges can elevate your meal to restaurant-level quality.

What Are Brats?

Before diving into the recipe, let’s take a closer look at brats:

  • Origins:
    • Bratwurst is a German sausage traditionally made from pork, beef, or veal.
    • Its unique blend of spices and herbs creates a distinctive flavor.
  • Varieties:
    • Fresh Brats: These are raw and require thorough cooking.
    • Pre-Cooked Brats: Partially cooked for convenience.
    • Flavored Brats: Options include beer-infused, spicy, or cheesy varieties.
  • Why Choose Brats?
    • Packed with protein and bold flavors, brats make for a satisfying meal.
    • They are versatile, pairing well with classic sides or innovative accompaniments.

The Benefits of Cooking Brats in an Air Fryer

The air fryer is a game-changer for cooking brats. Here’s why:

  • Healthier Cooking:
    • Uses little to no oil, reducing unnecessary fats while retaining flavor.
    • Avoids the carcinogens often associated with grilling.
  • Faster Results:
    • Preheats quickly and cooks within minutes, making it ideal for busy schedules.
  • Crispy Exterior, Juicy Interior:
    • The circulating hot air ensures even cooking, resulting in perfectly crisp exteriors and juicy insides.
  • Minimal Cleanup:
    • Forget the grease splatter! Air fryers are easy to clean, saving time and effort.

Looking for more quick air fryer recipes? Try air fryer asparagus or experiment with other vegetables to pair with your brats.

How to Prepare Brats for Air Frying

Preparation is key to achieving the perfect balance of crispness and flavor. Follow these steps:

1. Choosing Your Brats

  • Opt for fresh, high-quality brats for the richest flavor.
  • If you’re short on time, pre-cooked brats are a great alternative.
  • Specialty options like beer-infused or jalapeño brats can add a unique twist to your dish.

2. Thawing and Seasoning

  • Thaw Frozen Brats: Defrost them overnight in the refrigerator or use cold water for faster results.
  • Light Seasoning: While brats are flavorful on their own, brushing them with a light coat of oil or adding your favorite spices can enhance their taste.

3. Preheat the Air Fryer

  • Set the air fryer to 375°F (190°C) for optimal results.
  • Preheating ensures even cooking and a crispy casing.

Step-by-Step Cooking Guide for Air Fryer Brats

The Best Air Fryer Brats Recipe

Recipe by Air Fryer repastsCourse: Main CourseCuisine: German, AmericanDifficulty: Easy
Servings

4

servings
Prep time

5

minutes
Cooking time

15

minutes
Calories

280

kcal

Ingredients

  • 4 pieces bratwurst sausages

  • 1 cup sliced onions

  • 1 cup bell peppers

Directions

  • Preheat your air fryer to 370 degrees Fahrenheit for about 5 minutes to ensure even cooking of the sausages.
  • Place bratwurst sausages in a single layer in the basket, ensuring that they do not overlap for optimal air frying.
  • Cook the brats in the air fryer for 7-8 minutes. Check them halfway through to turn and ensure even browning.
  • Add sliced onions and bell peppers to the basket. Continue cooking for another 7 minutes until veggies are tender.
  • Use a meat thermometer to check that the internal sausage temperature reaches at least 160 degrees Fahrenheit.
  • Once cooked, remove brats and veggies from the air fryer. Serve together on a plate or within a bun.

Cooking brats in an air fryer is straightforward. Here’s a foolproof guide:

1. Prepare the Brats

  • Arrange the brats in the air fryer basket in a single layer, ensuring they don’t overlap.

2. Cooking Time

  • Fresh Brats: Cook for 12–15 minutes, flipping halfway through.
  • Pre-Cooked Brats: Cook for 8–10 minutes.
  • Check the internal temperature with a meat thermometer—it should reach 160°F (71°C).

3. Optional Additions

  • Add sliced onions, bell peppers, or mushrooms to the air fryer basket during the last 5 minutes for a one-basket meal.

4. Rest Before Serving

  • Allow the brats to rest for 2–3 minutes after cooking to let the juices settle.

Serving Suggestions for Air Fryer Brats

Traditional Pairings

  • Classic Sides:
    • Sauerkraut or coleslaw adds a tangy complement.
    • Potato salads or baked beans for a hearty meal.
  • Condiments:
    • Serve with mustard, ketchup, or horseradish for added flavor.

Modern Twists

  • Low-Carb Options:
    • Serve brats on a bed of lettuce or alongside a zucchini noodle salad.
  • Creative Toppings:
    • Experiment with avocado slices, spicy mayo, or caramelized onions.

Pair with Perfect Sides

Combine your brats with crispy fingerling potatoes or even a side of air fryer grilled cheese for an indulgent, well-rounded meal.

Creative Air Fryer Brat Recipes

1. Beer-Braised Brats

  • Marinate the brats in beer for an hour before cooking.
  • The beer infuses the sausages with a rich, malty flavor.

2. Cheesy Jalapeño Brats

  • Slice the brats lengthwise and stuff them with cheddar cheese and diced jalapeños before air frying.

3. Cajun-Spiced Brats

  • Rub the brats with a mix of Cajun spices for a smoky, spicy twist.
  • Serve with cornbread or rice.

Tips for Perfect Air Fryer Brats

1. Use a Meat Thermometer

  • Always confirm an internal temperature of 160°F for safety and optimal texture.

2. Don’t Overcrowd the Basket

  • Leave space between each brat to allow hot air to circulate evenly.

3. Experiment with Recipes

  • Switch up flavors by adding unique toppings or pairing brats with unconventional sides like air fryer churros for a sweet contrast.

4. Clean Your Air Fryer Regularly

  • Prevent grease buildup by cleaning the basket and tray after each use.

FAQs About Air Fryer Brats

1. Can You Cook Frozen Brats in an Air Fryer?

Yes! Simply increase the cooking time by 5–7 minutes. Ensure the internal temperature still reaches 160°F.

2. Do You Need to Boil Brats Before Air Frying?

No. The air fryer thoroughly cooks the brats while crisping the casing, eliminating the need for boiling.

3. Can You Cook Vegetables with Brats?

Absolutely! Toss in sliced onions, peppers, or even mushrooms for a complete, flavorful meal.

Conclusion

Cooking air fryer brats is an easy, healthy, and versatile way to enjoy this classic sausage. Whether you’re serving them at a summer barbecue or preparing a quick family dinner, the air fryer guarantees consistent, delicious results.

For more air fryer inspiration, explore recipes like air fryer churros for dessert or try air fryer asparagus to round out your meal.

Enjoy the perfect blend of crispy exteriors and juicy interiors with every bite. Ready to fire up your air fryer? Let the cooking adventure begin!

Got a Minute? Leave Us a Review!

0.0
0.0 out of 5 stars (based on 0 reviews)
Excellent0%
Very good0%
Average0%
Poor0%
Terrible0%

Others Reviews

There are no reviews yet. Be the first one to write one.


Did You Like Our Recipe ? Share it With Your Friends And Enjoy With them

Air Fryer Taquitos: How to Make Easy Crispy Taquitos in 10 Minutes

Air Fryer Taquitos

Air fryer taquitos are the perfect combination of crispy texture, savory fillings, and healthy cooking. Whether you’re whipping up a quick snack, an appetizer for a party, or a simple dinner, these rolled tortillas filled with meat, cheese, or veggies deliver big flavor without the mess and calories of deep frying.

In this comprehensive guide, we’ll cover everything you need to know about making the best air fryer taquitos, including detailed recipes, variations, serving suggestions, expert tips, and more. We’ll also provide internal links to related recipes that will take your air frying game to the next level.

Why Air Fryer Taquitos Are the Best

Air frying has revolutionized the way we prepare classic comfort foods. Here’s why air fryer taquitos are an unbeatable choice:

  • Healthier Option:
    Traditional taquitos are deep-fried, soaking up excess oil. Air frying reduces oil usage by up to 80%, making your taquitos lower in fat and calories.
  • Quick and Easy:
    With an air fryer, you can cook taquitos in just 8-10 minutes, making them perfect for busy weeknights or last-minute gatherings.
  • Consistent Crispiness:
    The air fryer ensures that your taquitos come out golden brown and crispy every time.
  • Less Mess:
    No need to deal with hot oil splatters or messy cleanup.

If you’re new to air frying, try this simple Air Fryer Asparagus Recipe to get comfortable with your appliance.

Ingredients for Perfect Taquitos

Air Fryer Taquitos

Recipe by Air Fryer repastsCourse: Lunch, DinnerCuisine: MexicanDifficulty: Easy
Servings

4

servings
Prep time

30

minutes
Cooking time

40

minutes
Calories

300

kcal
Total time

1

hour 

10

minutes

Ingredients

  • 1 lb ground beef

  • 1 tbsp taco seasoning

  • 0.5 cup salsa

  • 8 pieces corn tortillas

  • 1 cup shredded cheese

  • 1 tbsp vegetable oil

Directions

  • Preheat your air fryer to 400 degrees F for about 5 minutes to ensure it is hot enough for cooking the taquitos.
  • In a skillet, cook the ground beef over medium heat until fully browned. Add the taco seasoning and salsa, mixing thoroughly.
  • Warm the corn tortillas slightly in the microwave to make them pliable and prevent tearing when filling them with the beef mixture.
  • Spoon about two tablespoons of the beef mixture onto each tortilla, top with cheese, and roll them up tightly into a taquito shape.
  • Brush each taquito lightly with vegetable oil and place them seam-side down in the air fryer basket, avoiding overcrowding the basket.
  • Cook the taquitos in the air fryer at 400 degrees F for 8 to 10 minutes until they are golden brown and crisp. Serve immediately.

To make air fryer taquitos, you need just a few key ingredients. Here’s a breakdown of the essentials:

1. Tortillas

  • Corn Tortillas: The traditional choice, providing a crispy texture when air fried.
  • Flour Tortillas: Easier to roll and offer a chewier bite.

2. Protein Fillings

  • Shredded Chicken (rotisserie or homemade)
  • Ground Beef seasoned with taco spices
  • Pork Carnitas for a rich, savory flavor
  • Black Beans or Refried Beans for a vegetarian option

For more hearty meat dishes, try this Air Fryer Meatloaf Recipe.

3. Cheese Options

  • Mexican Cheese Blend (cheddar, Monterey Jack, queso quesadilla)
  • Pepper Jack Cheese for a spicy kick
  • Cream Cheese for creaminess

4. Seasonings

5. Extras

  • Diced Green Chiles for a burst of flavor
  • Onions and Garlic for added depth
  • Avocado Oil Spray for crisping

Classic Chicken Air Fryer Taquitos Recipe

Ingredients

  • 1 cup shredded chicken
  • 1/2 cup Mexican cheese blend
  • 6 corn tortillas
  • 2 tablespoons Neufchâtel cheese
  • 2 tablespoons diced green chiles
  • 1 teaspoon vegetable oil
  • Salt and pepper to taste
  • Avocado oil spray

Instructions

  1. Prepare the Filling:
    • Heat the vegetable oil in a skillet over medium heat.
    • Sauté diced onions until soft.
    • Add minced garlic and green chiles.
    • Stir in shredded chicken, Mexican cheese blend, and Neufchâtel cheese.
    • Season with salt and pepper and cook until the cheese is melted.
  2. Warm the Tortillas:
    • Heat tortillas in a skillet or microwave until pliable. This helps prevent cracking when rolling.
  3. Assemble the Taquitos:
    • Place 2-3 tablespoons of filling in each tortilla.
    • Roll tightly and secure with a toothpick if needed.
  4. Air Fry the Taquitos:
    • Preheat the air fryer to 400°F (200°C).
    • Arrange the taquitos in a single layer.
    • Spray lightly with avocado oil.
    • Cook for 6-9 minutes, flipping halfway.
  5. Serve and Enjoy:
    • Serve with guacamole, sour cream, or salsa.

Looking for the perfect side dish? Try these Perfectly Seasoned Air Fryer Potato Wedges.

Delicious Variations to Try

1. Beef Taquitos

  • Use seasoned ground beef instead of chicken.
  • Add pepper jack cheese for extra flavor.

2. Vegetarian Taquitos

  • Fill with black beans, corn, and cheese.
  • Add sautéed bell peppers and onions for a burst of flavor.

3. Breakfast Taquitos

  • Fill with scrambled eggs, bacon, and cheddar cheese.
  • A great way to start your morning with a protein-packed meal.

4. Seafood Taquitos

  • Use shrimp or crab meat mixed with cream cheese and green onions.
  • Ideal for seafood lovers who want something unique.

For a unique snack idea, check out these Corn Ribs in the Air Fryer.

Tips and Tricks for Perfect Taquitos

  • Warm Tortillas First: This prevents them from cracking when rolled.
  • Avoid Overfilling: Too much filling makes it difficult to roll the tortillas tightly.
  • Use Avocado Oil Spray: A light spray helps achieve a golden-brown finish.
  • Don’t Overcrowd the Air Fryer: Cook in batches for even crisping.
  • Flip Halfway: Ensures both sides get crispy.

Serving Suggestions and Pairings

Pair your air fryer taquitos with these delicious sides and dips:

  • Guacamole
  • Pico de Gallo
  • Sour Cream
  • Mexican Rice
  • Refried Beans

Looking for dessert? Try these Easy 3-Ingredient Air Fryer Desserts to finish your meal on a sweet note.

Common Mistakes and How to Avoid Them

  1. Overfilling the Tortillas:
    • Keep the filling to about 2-3 tablespoons to ensure easy rolling.
  2. Skipping the Warming Step:
    • Warm tortillas to make them more pliable and prevent cracking.
  3. Not Using Oil Spray:
    • A light spray of oil helps achieve a crispy texture.
  4. Overcrowding the Basket:
    • Give your taquitos enough space to cook evenly.

FAQs About Air Fryer Taquitos

1. Can You Use Flour Tortillas?

Yes! Flour tortillas create a softer, chewier texture compared to corn tortillas.

2. How Do You Keep Taquitos Crispy?

Spray them lightly with avocado oil and cook in a single layer.

3. Can You Freeze Air Fryer Taquitos?

Absolutely! Roll the taquitos and freeze them before air frying. When ready, cook straight from frozen for 8-10 minutes.

4. What Dips Go Best with Taquitos?

  • Guacamole
  • Salsa
  • Queso Dip
  • Sour Cream

Enjoy making your own air fryer taquitos with these tips, recipes, and variations. Whether you’re craving chicken, beef, or vegetarian options, the air fryer ensures you get the perfect crunch every time. Happy air frying!

Got a Minute? Leave Us a Review!

5.0
5.0 out of 5 stars (based on 3 reviews)
Excellent100%
Very good0%
Average0%
Poor0%
Terrible0%

Others Reviews

There are no reviews yet. Be the first one to write one.


Did You Like Our Recipe ? Share it With Your Friends And Enjoy With them

Air Fryer Potato Wedges: Perfectly And delicious

Air Fryer Potato Wedges

Air fryer potato wedges are the perfect combination of crispy, golden-brown outsides and fluffy insides. These wedges are not only easy to make but also a healthier alternative to deep-fried options. Whether you’re new to air frying or looking to perfect your technique, this guide covers everything you need to know to achieve crispy perfection. We’ll also share tips, seasoning variations, and the best way to serve your wedges.

If you love quick and easy air fryer recipes, these wedges are about to become a regular on your menu. Let’s dive in!

Why Choose Air Fryer Potato Wedges?

There are plenty of reasons why air fryer potato wedges have become a go-to snack and side dish. Here are some top benefits:

  1. Healthier Alternative: Air frying uses up to 80% less oil compared to deep frying, making these wedges a healthier option. According to Healthline, air frying reduces fat and calorie intake significantly.
  2. Quick and Easy: Air fryers are efficient, taking just 15-20 minutes to cook potato wedges to perfection.
  3. Crispy Texture: The air circulation in the fryer ensures that your wedges come out crispy on the outside and soft on the inside.
  4. Less Mess: No splattering oil or greasy mess to clean up afterward!

For a similar crispy experience, you might want to check out these crispy fingerling potatoes in the air fryer, which offer a delicious variation of this classic recipe.

Ingredients for Perfect Air Fryer Potato Wedges

To make the perfect potato wedges, you’ll need the following ingredients:

  • 4 medium Russet potatoes (or Yukon Gold for a creamier texture)
  • 2 tablespoons olive oil (or another high-smoke-point oil like avocado oil)
  • Salt and pepper to taste
  • Optional seasonings: Garlic powder, paprika, onion powder, dried herbs (like rosemary or thyme)

If you enjoy cheesy flavors, try seasoning them similarly to this crispy air fryer grilled cheese for an extra-rich twist.

Step-by-Step Instructions

Follow these easy steps to make crispy air fryer potato wedges:

Air Fryer Potato Wedges

Course: Snack, Side DishCuisine: AmericanDifficulty: Easy
Servings

4

servings
Prep time

10

minutes
Cooking time

25

minutes
Calories

180

kcal

Ingredients

  • 3 large russet potatoes

  • 2 tablespoons olive oil

  • 1 teaspoon garlic powder

  • 1 teaspoon paprika

  • 1 teaspoon salt

  • 0.5 teaspoon black pepper

  • 1 tablespoon chopped fresh parsley

Directions

  • Wash the russet potatoes thoroughly under running water and gently scrub the skins to remove any dirt. Pat them dry using a clean towel.
  • Cut the potatoes into wedges by slicing each potato in half, then into quarters, and finally into eighths.
  • In a large mixing bowl, combine the olive oil, garlic powder, paprika, salt, and black pepper. Stir to create a uniform seasoning blend.
  • Add the potato wedges to the bowl, ensuring each piece is coated evenly with the seasoning mixture by tossing the wedges in the bowl.
  • Preheat your air fryer to 400 degrees Fahrenheit for approximately 5 minutes to ensure it reaches the right cooking temperature.
  • Place the potato wedges in the air fryer basket in a single layer, avoiding overcrowding to ensure even cooking.
  • Cook the wedges at 400 degrees Fahrenheit for 20 to 25 minutes, shaking the basket halfway through the cooking time for even crispiness.
  • Carefully remove the potato wedges from the air fryer and sprinkle them with fresh parsley before serving. Check for desired crispiness and enjoy immediately.

1. Prepare the Potatoes

  • Wash the potatoes thoroughly to remove any dirt.
  • If desired, peel the potatoes. Leaving the skin on adds texture and nutrients.
  • Cut the potatoes into wedges by first slicing each potato in half lengthwise. Then, divide each half into 3-4 equal-sized wedges, depending on the potato’s size.

2. Soak the Wedges

  • Place the potato wedges in a bowl of cold water and let them soak for a minimum of 30 minutes.
  • After soaking, dry the wedges completely with a clean kitchen towel or paper towels. The more thoroughly you dry the potatoes, the crispier they will turn out.

3. Season the Wedges

  • In a large bowl, toss the wedges with:
    • 2 tablespoons of olive oil
    • Salt and pepper to taste
    • Your chosen seasonings (e.g., garlic powder, paprika, dried herbs)

4. Preheat the Air Fryer

  • Preheat your air fryer to 400°F (200°C) for about 5 minutes. Preheating ensures the wedges cook evenly.

5. Cook the Wedges

  • Arrange the wedges in a single layer in the air fryer basket. Avoid overcrowding to allow proper air circulation.
  • Cook for 15-20 minutes, shaking or flipping the wedges halfway through to ensure even cooking.
  • The wedges are done when they are golden-brown and crispy on the outside.

Tips for Extra-Crispy Potato Wedges

Achieving the crispiest potato wedges is all about technique. Here are some tips to ensure success:

  1. Dry Thoroughly: After soaking, make sure the wedges are completely dry. Excess moisture prevents them from crisping up.
  2. Use Cornstarch: Lightly dusting the wedges with cornstarch before cooking can enhance their crunchiness.
  3. Avoid Overcrowding: Cook in batches if necessary to ensure the wedges are not piled on top of each other.
  4. Shake the Basket: Halfway through cooking, shake the air fryer basket to ensure the wedges cook evenly on all sides.

Seasoning Variations

Want to switch things up? Try these delicious seasoning ideas:

  • Spicy Cajun Wedges: Season with paprika, cayenne pepper, and garlic powder for a spicy kick.
  • Garlic Parmesan Wedges: Toss the cooked wedges with grated Parmesan and garlic powder for a cheesy flavor.
  • Herby Delight: Add dried herbs like rosemary, thyme, and oregano for a fragrant touch.

For more air fryer inspiration, these crispy air fryer churros are a fun, sweet treat to enjoy after your savory wedges.

Serving Suggestions and Dipping Sauces

Air fryer potato wedges are incredibly versatile. Here are some serving ideas and dipping sauces:

Pair your wedges with a juicy air fryer New York strip steak for a complete and satisfying meal.

How to Store and Reheat Potato Wedges

Storing Leftovers

  • Place leftover wedges in an airtight container in the fridge for up to 3 days.

Reheating for Crispiness

  • To maintain their crunch, reheat the wedges in the air fryer at 350°F (175°C) for 5-7 minutes. This method brings back their crispy texture.

FAQs About Air Fryer Potato Wedges

Why Aren’t My Wedges Crispy?

  • Ensure the wedges are completely dry before cooking.
  • Avoid overcrowding the air fryer basket.

Can I Use Sweet Potatoes?

  • Absolutely! Sweet potatoes make a delicious, slightly sweet alternative.

What’s the Best Oil to Use?

  • Olive oil and avocado oil are great choices due to their high smoke points.

Conclusion

Making crispy air fryer potato wedges is easy, healthy, and incredibly satisfying. With the right preparation, seasoning, and cooking tips, you’ll achieve that perfect golden-brown crunch every time. Whether you’re serving them as a snack, a side, or pairing them with your favorite air fryer meals, these wedges are sure to be a hit.

Happy air frying! 🥔✨

Air Fryer Grilled Cheese: Crispy and Easy

Air Fryer Grilled Cheese

A grilled cheese sandwich is a classic comfort food loved by all ages. But have you ever tried making it in an air fryer? This modern kitchen gadget transforms the way you prepare grilled cheese, offering a crispy, golden-brown crust and melty cheese interior with minimal effort. An air fryer gives you quick, consistent results, and the best part is there’s no greasy mess to clean up afterward!

This guide will walk you through everything you need to know about making the perfect air fryer grilled cheese, including step-by-step instructions, creative variations, troubleshooting tips, and answers to frequently asked questions. Get ready to level up your grilled cheese game!

Craving a side dish? Pair your sandwich with these Crispy Fingerling Potatoes in the Air Fryer for a hearty meal.

Why Use an Air Fryer for Grilled Cheese?

If you’ve ever struggled with getting an evenly toasted grilled cheese on the stovetop, an air fryer can solve that problem. Here are some compelling reasons to use an air fryer for grilled cheese:

  • Even Crisping: The circulating hot air ensures the bread is toasted uniformly on both sides. No more worrying about burnt spots or uneven cooking.
  • Quick and Convenient: An air fryer typically cooks grilled cheese in 5-7 minutes, compared to the 10-15 minutes it takes on a stovetop.
  • No Mess: Forget about greasy skillets or pans to clean up. The air fryer basket makes cleanup a breeze.
  • Hands-Free Cooking: Unlike the stovetop, where you need to watch and flip constantly, an air fryer allows you to step away while it works its magic.

Want to try other quick and delicious air fryer meals? Check out these Turkey Burgers in the Air Fryer for a healthy, flavorful option.

Ingredients and Tools You’ll Need

Essential Ingredients

Air Fryer Grilled Cheese

Recipe by [email protected]Course: Lunch, Dinner, SnackCuisine: AmericanDifficulty: Easy
Servings

2

servings
Prep time

5

minutes
Cooking time

8

minutes
Calories

400

kcal

Ingredients

  • 4 slices bread

  • 2 slices cheese

  • 2 tablespoons butter

Directions

  • Preheat your air fryer to 370°F (188°C). Meanwhile, spread butter evenly on one side of each slice of bread.
  • Place cheese slices between two pieces of bread with buttered sides facing out, forming a sandwich.
  • Shortly open the air fryer basket and place the sandwich inside. Close the basket and set the timer for 4 minutes.
  • After 4 minutes, carefully flip the sandwich using a spatula to ensure even crispiness on both sides.
  • Cook for an additional 3-4 minutes until the bread is golden brown and the cheese is melted inside.
  • Remove the sandwich from the air fryer using tongs, let it cool slightly, then slice it in half and serve.

Notes

  • Note About the Ingredients *-*
    When making air fryer grilled cheese, the quality of your ingredients can significantly impact the final result. Here are some tips to ensure your sandwich is top-notch:
    Bread: Opt for fresh, thick-cut bread like sourdough, multigrain, or brioche. Thicker slices hold up better in the air fryer and provide a satisfying crunch.
    Cheese: High-quality cheese makes a difference. Choose varieties that melt well, such as sharp cheddar, gouda, mozzarella, or Swiss. Pre-shredded cheese may contain anti-caking agents that affect melting.
    Butter or Mayonnaise: Use room-temperature butter for easy spreading, or try mayonnaise for a tangy twist and an even golden crust.
    These simple choices can take your grilled cheese from ordinary to extraordinary!
  • Bread: Thick-cut slices like sourdough, multigrain, or classic white bread work best. The thickness helps prevent the bread from getting too crispy or burnt.
  • Cheese: Sharp cheddar is a staple for grilled cheese, but feel free to experiment with gouda, mozzarella, pepper jack, or Swiss.
  • Butter or Mayonnaise: These fats give your sandwich that signature golden-brown crust. Mayonnaise can be a great alternative to butter and provides a tangy flavor.

For another easy-to-make air fryer recipe, check out these Air Fryer Artichoke Hearts for a light, crispy snack.

Optional Add-ons

Tools

  • Air Fryer: Any model will do, but a 3-quart or larger basket is ideal.
  • Silicone Spatula: Helps with flipping without scratching the air fryer basket.
  • Sharp Knife: For slicing ingredients and cutting the sandwich.

How to Make the Perfect Air Fryer Grilled Cheese

Follow these simple steps to achieve the perfect air fryer grilled cheese every time:

1. Preheat Your Air Fryer

  • Set your air fryer to 375°F (190°C). Preheating ensures the sandwich cooks evenly and crisps up perfectly.

2. Assemble the Sandwich

  • Apply a light coating of butter or mayonnaise to one side of each slice of bread.
  • Place one or two slices of your preferred cheese between the unbuttered sides of the bread. Feel free to add any extra fillings like tomatoes or bacon.

3. Cook the Sandwich

  • Place the sandwich in the air fryer basket with the buttered side facing out.
  • Cook for 3-4 minutes on one side, then flip and cook for another 1-2 minutes until the bread is golden brown and the cheese is melted.

4. Check and Serve

  • Check to make sure the cheese is fully melted and the bread is evenly toasted.
  • Let the sandwich sit for 1 minute before slicing to allow the cheese to set slightly.

For a fun appetizer to serve alongside your grilled cheese, try these Fried Ravioli in the Air Fryer for a crispy, cheesy snack.

Delicious Variations of Air Fryer Grilled Cheese

Take your grilled cheese to the next level with these fun and tasty variations:

  • Double Cheese Delight: Combine sharp cheddar with creamy brie or mozzarella for a rich and gooey melt.
  • Caprese Grilled Cheese: Add sliced tomatoes, fresh basil, and a drizzle of balsamic glaze for a gourmet twist.
  • Bacon Avocado Grilled Cheese: Add crispy bacon and slices of avocado for extra flavor and texture.
  • Spicy Pepper Jack: Use pepper jack cheese and add pickled jalapeños for a spicy kick.

Common Mistakes to Avoid

Even though making grilled cheese in an air fryer is simple, here are some mistakes to avoid:

  • Skipping Preheating: Preheating helps ensure even cooking and prevents the bread from toasting too quickly.
  • Overfilling the Sandwich: Too many fillings can prevent the sandwich from cooking evenly or result in soggy bread.
  • Not Flipping the Sandwich: Flipping helps achieve an even golden-brown crust on both sides.
  • Using Low-Quality Cheese: For the best melt, use high-quality cheese that doesn’t separate or become oily.

Nutritional Information

A classic air fryer grilled cheese contains approximately:

  • Calories: 395
  • Protein: 18g
  • Fat: 24g
  • Carbohydrates: 26g

Healthier Options

  • Use whole-grain bread instead of white bread.
  • Opt for reduced-fat cheese to lower the calorie count.
  • Replace butter with a light spray of olive oil.

Frequently Asked Questions (FAQs)

1. Can I Use Frozen Bread?

Yes! Just thaw it slightly or increase the cooking time by 1-2 minutes for even results.

2. What’s the Best Cheese for Melting?

Sharp cheddar, mozzarella, gouda, and pepper jack are excellent choices for a melty, gooey sandwich.

3. How Do I Reheat Grilled Cheese in an Air Fryer?

Reheat at 350°F (175°C) for 2-3 minutes to restore the crispy texture.

4. Can I Make Grilled Cheese Without Butter?

Absolutely! Use mayonnaise or a light spray of olive oil for a similar golden crust.


Perfect Pairings for Grilled Cheese

  • Tomato Soup: A classic comfort pairing that balances the richness of the sandwich.
  • Salads: A fresh arugula or Caesar salad complements the heaviness of the cheese.
  • Dips: Marinara sauce, ranch, or honey mustard make excellent dipping options.

Final Thoughts

Making a grilled cheese sandwich in an air fryer is a game-changer. It’s quick, easy, and produces consistent results with minimal effort. Whether you stick to the classic version or experiment with fun variations, the air fryer ensures a crispy, melty sandwich every time. Try it out, explore different cheeses and fillings, and enjoy this upgraded comfort food!

Happy air frying! 😊

How To Make air fryer cornish hen

How To Make air fryer cornish hen

Cooking a Cornish hen in an air fryer is the secret to achieving a crispy, golden exterior with a juicy, tender interior, all in a fraction of the time it would take in a traditional oven. If you’re looking for a delicious, easy-to-make dinner that will impress guests or elevate your weeknight meals, air fryer Cornish hen is the way to go. This guide will walk you through every step, from selecting the perfect Cornish hen to serving it up with tasty sides. By the end, you’ll know exactly how to make air fryer Cornish hen that’s crispy on the outside and tender on the inside.

What Is a Cornish Hen? Understanding the Basics

Before diving into how to cook a Cornish hen in the air fryer, let’s first clarify what exactly a Cornish hen is. Unlike a regular chicken, a Cornish hen is a breed of small, tender chicken typically weighing between 1 to 2 pounds. Because of its smaller size, it cooks faster than a whole chicken, making it the perfect option for those looking to prepare a meal in less time.

Cornish hens are particularly popular for their tender, juicy meat and crisp skin, and they are often used for special occasions, holiday meals, or smaller dinner parties. They’re ideal for serving one per person, which adds an extra touch of elegance to your meal. Whether you’re cooking for one or preparing a meal for the whole family, Cornish hens offer a delightful dining experience.

Why Choose an Air Fryer for Cooking Cornish Hen?

If you haven’t tried using an air fryer for cooking chicken or Cornish hen, you’re in for a treat. Air fryers work by circulating hot air around the food, producing a crispy texture that mimics deep frying but without the need for excessive oil. Here’s why cooking a Cornish hen in the air fryer is an excellent choice:

  1. Speed: The air fryer cooks food much faster than traditional methods like roasting in the oven. For instance, a Cornish hen that would take up to 60 minutes in the oven can be ready in as little as 30 minutes in the air fryer.
  2. Crispy Texture: Air fryers are well-known for their ability to produce crisp, golden-brown exteriors. The circulating hot air ensures that your Cornish hen will come out with a perfectly crispy skin while keeping the meat juicy and tender.
  3. Healthier Cooking: Because air fryers require minimal oil—often just a light spray of cooking oil—you can enjoy all the crispy goodness without the extra calories and fat that come from deep frying.
  4. Convenience: Air fryers are easy to use, don’t heat up your whole kitchen, and are easier to clean than ovens or deep fryers. Simply place the Cornish hen in the basket, set the temperature, and let the air fryer do the work.

By using the air fryer, you’ll enjoy the crispy texture and juicy flavor of Cornish hen with less mess and in less time.

Ingredients for Making Air Fryer Cornish Hen

One of the great things about cooking Cornish hen in the air fryer is that it doesn’t require a ton of ingredients. The key to a flavorful, crispy hen lies in a few simple ingredients that enhance its natural taste.

Here’s a list of what you’ll need:

Ingredients Table:

IngredientQuantity
Cornish hen2 whole
Olive oil2 tbsp
Garlic powder1 tsp
Paprika1 tsp
SaltTo taste
Black pepperTo taste
Fresh thyme or rosemaryOptional
Lemon (optional)1

Preparing Your Cornish Hen for the Air Fryer Recipe

Before you start cooking your Cornish hen, you’ll need to prepare it for the air fryer. The key here is to ensure your Cornish hen is dry, well-seasoned, and ready for a quick cook.

  1. Rinse and Dry: Start by rinsing the Cornish hen under cold water to remove any excess moisture or residue. After rinsing, make sure to pat it dry with paper towels. The dryer the skin, the crispier it will get in the air fryer.
  2. Seasoning: Once your Cornish hen is dry, rub it generously with olive oil. This helps the skin crisp up beautifully during cooking. Then, season it with salt, black pepper, garlic powder, and paprika. You can also add fresh herbs like thyme or rosemary to infuse additional flavors into the meat. Don’t forget to stuff the cavity of the hen with a slice of lemon for extra flavor (optional, but it adds a delightful citrusy note).
  3. Resting: Let the hen rest for 5-10 minutes after seasoning. This allows the seasoning to penetrate the meat and ensures the air fryer works its magic more efficiently.

How to Cook Air Fryer Cornish Hen: Step-by-Step Instructions

Cooking a Cornish hen in the air fryer is quick and easy. Follow these simple steps to achieve the perfect crispy, juicy meal every time.

1. Preheat the Air Fryer

Start by preheating your air fryer to 375°F (190°C). Preheating ensures that the air fryer is hot enough to cook the Cornish hen evenly and produce that crisp skin you’re looking for.

2. Place the Cornish Hen in the Air Fryer

Carefully place your seasoned Cornish hen in the air fryer basket, breast side down. Make sure the hen fits comfortably in the basket and doesn’t crowd the air circulation. If necessary, you can cook one hen at a time for optimal results.

3. Cook the Cornish Hen

Cook the Cornish hen for 25-30 minutes. After about 15 minutes, flip the hen over so that the breast side is facing up. This ensures that both sides are evenly cooked and crispy. The exact cooking time may vary depending on the size of the hen, so be sure to check it periodically.

4. Check for Doneness

To ensure your Cornish hen is fully cooked, use a meat thermometer to check the internal temperature. It should read 165°F (74°C) in the thickest part of the meat (usually the breast or thigh). If the temperature hasn’t reached 165°F yet, continue cooking for a few more minutes.

5. Rest Before Serving

Once the Cornish hen is fully cooked, remove it from the air fryer and let it rest for 5 minutes. This resting period allows the juices to redistribute, ensuring a juicy and flavorful bite every time.

Tips for the Perfect Air Fryer Cornish Hen

Here are a few additional tips to help you get the best results when cooking Cornish hen in the air fryer:

  • Don’t Overcrowd the Air Fryer: If you’re cooking more than one Cornish hen, make sure there’s enough space for air to circulate around each hen. This ensures that the skin becomes crispy and the meat cooks evenly.
  • Spray the Skin for Extra Crispiness: If you want an even crispier skin, lightly spray the hen with cooking spray or olive oil spray before cooking. This helps promote browning and crispiness.
  • Use Fresh Herbs: Adding fresh herbs like thyme or rosemary inside the cavity or under the skin will infuse the meat with additional flavor.
  • Check the Temperature: Always use a meat thermometer to ensure your Cornish hen is cooked to perfection. This guarantees that the meat is fully cooked without being dry.

What to Serve with Air Fryer Cornish Hen

Now that you’ve made a perfectly crispy Cornish hen, it’s time to think about side dishes. Here are a few ideas to complement the flavors of the hen:

  • Roasted Vegetables: Roasted carrots, potatoes, and Brussels sprouts make the perfect accompaniment to Cornish hen. Their earthy flavors balance out the rich meat.
  • Rice or Couscous: A fluffy side of rice or couscous can soak up the delicious juices from the hen.
  • Fresh Salad: Pair the Cornish hen with a light, fresh salad of mixed greens, cucumbers, and a tangy vinaigrette to balance the richness of the hen.
  • Garlic Bread or Dinner Rolls: Fresh, warm bread is always a crowd-pleaser and pairs wonderfully with the tender meat of the Cornish hen.

Storing Leftover Air Fryer Cornish Hen

If you happen to have any leftovers (though that’s unlikely!), here’s how to store them properly:

  • Let the Cornish hen cool to room temperature before storing it.
  • Store any leftover Cornish hen in an airtight container in the fridge for up to 3 days.
  • To reheat, place the hen back in the air fryer for about 5-10 minutes at 350°F (175°C) to re-crisp the skin and heat the meat through.

Air Fryer Cornish Hen FAQs

How long does it take to cook a Cornish hen in the air fryer?

  • Typically, it takes 25-30 minutes at 375°F (190°C) to cook a Cornish hen, depending on its size.

Can I cook two Cornish hens at once in the air fryer?

  • Yes, you can cook two Cornish hens, but ensure there is enough space between them for the air to circulate freely.

Can I marinate the Cornish hen before cooking?

  • Absolutely! Marinating your Cornish hen for a few hours or overnight will enhance its flavor. Just be sure to pat the hen dry before air frying to ensure a crispy skin.

What should I do if my Cornish hen is too large for the air fryer?

  • If your Cornish hen is too large to fit comfortably in the air fryer basket, consider cutting it in half or cooking it in batches. This will allow better air circulation and more even cooking.

How do I know when my Cornish hen is fully cooked?

  • Use a meat thermometer to check the internal temperature. It should reach 165°F (74°C) in the thickest part of the meat, such as the breast or thigh.

Conclusion: Enjoy Your Crispy, Juicy Air Fryer Cornish Hen!

Cooking an air fryer Cornish hen is one of the easiest ways to enjoy a tender, flavorful, and perfectly crispy chicken dinner. Whether you’re serving it for a special occasion or preparing a simple weeknight meal, this method provides all the benefits of traditional roasting without the long wait times or excess oil.

With a few simple ingredients, an air fryer, and just a little preparation, you can serve a meal that’s not only delicious but also healthier. Try this recipe today, and don’t be afraid to experiment with your own seasonings and sides. The result will be a meal that both you and your family will love!

Ready to try it out? Fire up your air fryer and enjoy your Cornish hen in under 30 minutes. Bon appétit!

Call to Action:

If you loved this air fryer Cornish hen recipe, don’t forget to share it with friends and family! Have any tips or variations of your own? Drop a comment below to share your experience or ask any questions. Also, feel free to check out our other air fryer recipes for more quick and delicious meal ideas!